Full body tracking, or pose tracking, skeleton tracking, etc.. is a hardware 📷 and software technology used for producing a virtual three dimensional representation of a person’s body in real time 🕺. This technology recently gained my interest for a video game modding project 🎮. However, capturing the body movements in real time is not an easy task and a combination of specialized hardware 📷 and software 💾 is necessary to achieve it.

> An illustration of 3D pose tracking. Image by Melvyn Roerdink.
As I was looking for a cheap and reliable solution, I spent some time reviewing and compare existing methods 👀. In this blog post 📃, I will expose multiple options that I found to solve this problem. I will particularly focus on the Kinect 🎥, a gaming device developed by Microsoft. We will explore what the device is actually capable of and we will see how to setup a working environment on Linux to develop for the Kinect and actually perform 3D tracking. This topic will also give the opportunity to argument about open source, about the usability of consumer products and obsolescence 💬.
Full body tracking starter guide
There exist several technologies capable of performing body tracking:
-
A first solution can be found around Virtual Reality devices. Some allow for full body tracking but these devices remain particularly expensive.
-
Motion capture is another solution, mostly used in the cinema industry 🎬. This solution may necessitate heavy hardware (multiple cameras) with additional body markers and is more relevant for professional applications.
-
Deep learning technologies may help here as well. Some models allow for pose estimation from RGB cameras thanks to Convolutional Neural Networks, even in real time. These software based solutions would however require high GPU compute capabilities to perform fast neural network inference and reach a decent framerate.
-
Depth cameras are the last option that I found, the Kinect being one of them. These devices use various type of imaging sensors for reconstructing depth images, where each pixel represents a distance to the camera. Several devices exist but once again, most of them are rather expensive.

> The intel RealSense D435 device, another type of Depth camera. Image from wikimedia.
Looking for affordable options 💰
The advent of VR technologies has further encouraged the development of cheap and/or open source tracking solutions. Various solutions have been imagined such as wearing sensors/markers or relying on webcams. For instance the kick-started open source SlimeVR device is a camera-free solution based on a set of wearable sensors 👖. Another example is actually the Kinect, considered as an old consumer device used by several open source solutions.
> The wearable tracking devices from SlimeVR’s solution. Image from SliveVR.
In the end, the Kinect appears to me as one of the most convenient and affordable option. Indeed, the device can still be found today and have become particularly cheap. However, a condition for the device to be usable is the availability of drivers and libraries. This part is not easy as hardware and software is evolving fast and such devices, produced by profit companies, are mostly closed source and even safe-guarded 🔒!
But what is the Kinect ? 📽️
The Kinect is a 15 years old 👴 device developed by Microsoft as a motion game controller for its Xbox 360 console. More precisely, the Kinect enables the capture of a depth buffer and reconstruction of 3D skeleton of a player, allowing for precise interactions in virtual applications such as video games.
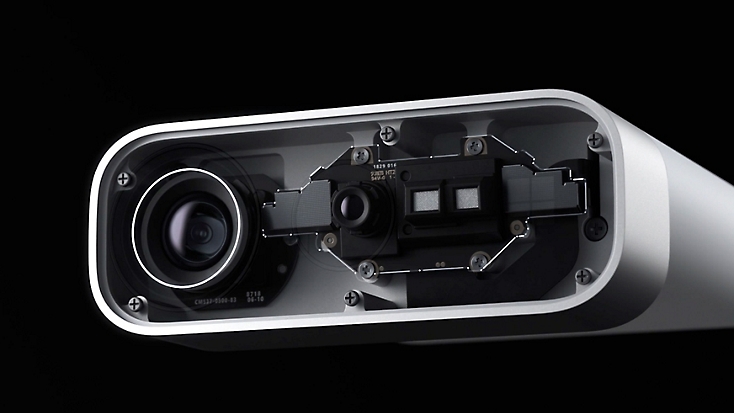
The Kinect device was first presented at the E3 2009 conference (as Project Natal) as a motion controller in response to Nintendo’s Wii Remote and Sony’s PlayStation Move. The device was presented as a webcam and was not intended to be used in combination with another physical device 🎮. It has a microphone, a set of motors and 2 cameras: a RGB camera and an InfraRed Depth camera.

> The original Kinect for xbox 360, image from wikimedia.
One of the main aspect of the device is of course its capability to perform 3D pose tracking in realtime, that is to recover a coarse 3D skeleton of people’s body in the camera field. This feature is of interest in the gaming industry 🎲 but also in other areas such as healthcare 🧑⚕️, robotics 🤖, etc..
The Kinect’s successors 🪦
Despite the limited success of the first Kinect’s 💸, Microsoft released a second version of its device together with the Xbox One console in 2013. The new device, called Kinect 2 or Kinect One, was originally controversially bundled with the new console to favor its adoption. As we may understand, criticisms were notably raised for privacy concerns 🔒. This resulted in an updated version of the console that was then sold alone, its Kinect port being removed by Microsoft (an external power adapter was then provided with the device).
The Kinect development kits
In parallel, Microsoft also released alternative versions of the two controllers dedicated to developers and professionals: the Kinect for Windows and Kinect 2 for Windows. These two additional devices had their hardware slightly modified compared to the original ones. Theses releases were accompanied by two respective Software Development Kits (and drivers), allowing developers to write their own applications 🧑💻 for the Kinects. Of course, we were not ready to see any effort from Microsoft to release Linux or Macos versions of the drivers and SDK’s 🤷. Also important to note, these products were sold at a significantly higher price 💵 than their Xbox counterparts 🕹️, and they are rather difficult to find these days.

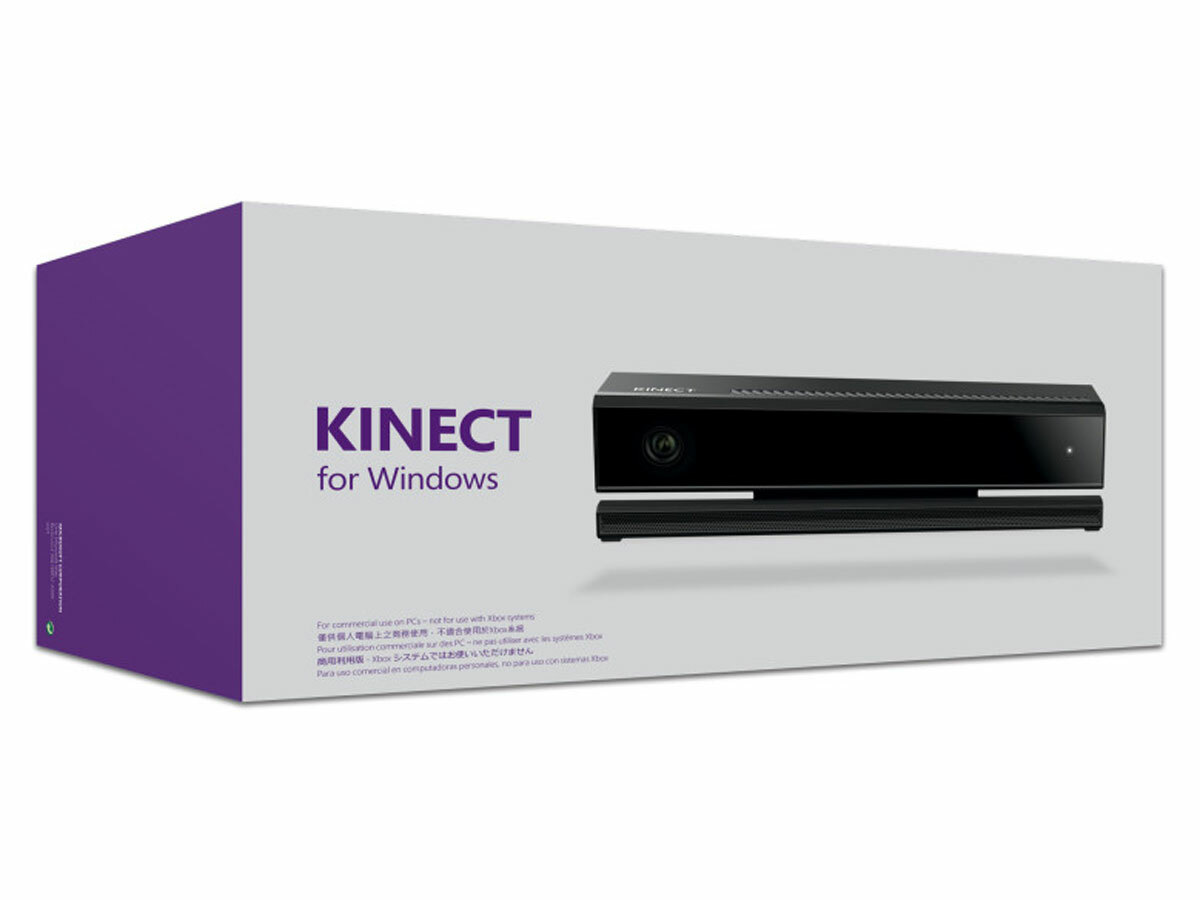
> On the left, the first Kinect for Windows (image from PC Perspective). On the right, the second Kinect for Windows (image from Stuff.tv).
Although Microsoft’s SDK had official support only for the Windows versions of the two Kinects hardware, it has been discovered that the two versions of the devices (Windows vs Xbox) were extremely close, even allowing for SDK compatibility with the Xbox Kinects! 😶 This fact has probably driven the developer community to invest more efforts in using the device!
In 2020, Microsoft persisted with its Kinects by releasing a third model: the Azure Kinect. More precise than its predecessors, this product was released as a development device only 📦, with target applications primarily outside of the gaming industry 🏭. Similarly to the other Kinect’s development kits, the Azure Kinect was sold at a much higher price than the consumer level ones 👾. The device did not last long as Microsoft announced its discontinuation in late 2023 ☠️ (few specimens might still be found at the moment at a high price).
> The azure Kinect sensor, image by Microsoft.
Kinect hacking and open source drivers
Before diving into body tracking tools for the Kinect, I wanted to cover a bit of history around Kinect’s hack. When the device was released, a bounty was offered by Adafruit to the first people being able to hack the camera: that is developing a custom driver and obtain a depth image. Although disapproved by Microsoft, this event helped the release of open source 🔓 and multi-platform drivers 🐧 while Microsoft only supported Windows systems 🪟 and Kinect for Windows. Although hacking may usually be seen as controversial, such a hack would actually have the effect of encouraging the usability of the product. It appears to me here as an elegant way of encouraging developers to familiarize around a technology ⚙️ and also fight against its obsolescence 🚮.
Anyway, the bounty was a success as a hacking community was formed around the Kinect. A tutorial was even made by Adafruit on how to hack the device! The second Kinect was also rapidly hacked and two open source drivers for the two devices have been released as a result: libfreenect 1 and 2. These actions have probably greatly contributed to increasing the usability of the Kinects despite of its limited success in the gaming world 👾.
Looking for pose tracking libraries for the Kinect
The Kinect’s hardware itself is not capable of directly providing a full body skeleton that can be exploited in applications. It is instead in charge of re-constructing and sending the monochrome depth image 🖼️ from its structured light IR sensor/projector to a computer (which is already substantial!).
.jpg)
> An example of depth image captured by the Kinect. Image from Leland Holmquest.
The skeleton reconstruction is rather performed on the software side 🖥️. Let’s face it, this is definitely not an easy problem! Up to these days, only few libraries/softwares are available to perform this task. I was surprised to find only few notes on the skeleton tracking problem in the open drivers documentation. In my opinion, the Kinect becomes less interesting without this feature and I am surprised that we did not see additional efforts in releasing an open source solution 🤔. After spending some time digging into the subject, I will review here what I could actually find 🔎.
Microsoft’s algorithm and SDK
With the release of the first Kinect in 2010, Microsoft faced the challenge of releasing a fully-working computing library for extracting skeleton information from a depth image, for its in-game applications. Although Microsoft would obviously not release an open-source solution of its algorithm 🔒, some piece of information is still available online about its technology. This conference talk and the associated paper explain that Microsoft Reasearch developed an approach based on machine learning. More precisely, the proposed machine learning model is a classification model in charge of associating the depth pixels to body parts. The model, based on kind of random forest 🌲, was trained (fitted) on a motion captured dataset. Of course at the time deep learning was not as popular as it is today. Additional research material on the algorithm may be found online (here and there for instance).


> On the left, result of the random forest classification of body parts from depth pixels. On the right, the resulting skeleton joints estimation. Images from Microsoft.
When it comes to the implementation, we mentioned earlier the Kinect and Kinect 2 SDK released by Microsoft together with the release of the Windows versions of the devices. The SDK came with Kinect’s drivers ⚙️ and with an implementation of Microsoft’s skeleton algorithms for both the first and second Kinects (the skeleton is more detailed 🔬 with the second Kinect, which may be due to the higher definition of the depth image as well as some improvements on the algorithms). Athough the original Xbox Kinects were not officially supported by the framework, the SDK do work and is a first viable solution for performing skeleton tracking. Unfortunately, a closed source and Windows only solution was not satisfying to me 😒, which made me keep exploring.
OpenNI framework and NITE
The second solution is OpenNI, an open source framework developed by the PrimeSense company. PrimeSense was actually at the origin of Kinect’s hardware and the company was then bought by Apple in 2013.

> Architecture of the OpenNI framework. Image from Yannick Loriot.
OpenNI was developed to mutualize natural interface devices such as depth cameras together with processing algorithms into one API. About one year after the release of the Kinect, PrimeSense released an open source version of OpenNI. A library 📚 called NITE was also freely released, binary only this time 🔢, to take care of skeleton reconstructions and other complex computations. From this release, several open source Kinect drivers have been provided such as this one by github user avin2 (I absolutely don’t now if it is an open source project, if it comes from the libfreenect project or if it is an official driver… 🤷).
Anyway, these three components : OpenNI, a Kinect driver and the NITE library appeared as a viable multi-platform solution for skeleton tracking with the first Kinect 👨💻 and has been easily adopted by the kinect hobbyists community. Unfortunately, combining the fact that these libraries are unmaintained, not fully open source and that the official documentation 🗎 is unavailable, the usage has become more difficult today 😬. We will still see at the end of the post how to set up the Kinect developement environment with tracking through OpenNI ⬇️.
A more recent version, OpenNI2, was also released and can still be found these days. It seems usable not only with the first Kinect but also with the second one 📸. Several pages on the web seems to indicate that this is also a solution to develop with the two Kinects on Linux: for instance see here and here and here. But because there are few resources available on the web, I will keep the focus on the first Kinect in this post.
Alternatives
Due to the difficulty of the problem, it is clear that reliable solutions would be primarily brought through commercial products 🛒, which is a shame for the open source world 🌐. The Kinect SDK’s and the OpenNI solution are by far the most considered ones. Nevertheless, few alternatives can still be found.
First, NuiTrack is a commercial software that performs multi-device Skeleton tracking, including support for the three Kinects. It remains a closed source and expensive solution but it is apparently still maintained 🗓️. Few information is available about its technology but part of it seems to be powered by deep learning. This solution may however be usable on arm64 platforms, which includes the RaspberryPi 4. This could indicate that the underlying algorithm is not unreasonably intensive ⚡.
> The NuiTrack software in action. Image by NuiTrack.
By further digging into existing algorithms, I came up onto additional solutions developed by small teams or individuals and that do not rely on machine learning.
These solutions seem to be rather based on mathematical and physical models of the body, by minimizing geodesic distances for instance 📐.
Norman0406 on github made available a fully open source solution 🧑💻 apparently developed during a research project: OpenSkeletonFitting.
Kudos to them for achieving and releasing the full code!
More information about the approach is available in the OpenSkeletonFitting/Doc directory.
I came across a quite related approach which seems to be a thesis work by Abhishek Kar, available here but I was not able to find an open source implementation for this one.
The remaining approaches that I found belong to the research world 🧑🔬. I came through several research articles here, here, there and there. Sadly, it seems that the authors rarely share their source code details… 😢 This is bad! Overall there is a mix of approaches with machine learning and more explicit modeling of the human body. I can however surprisingly note this method (working on RGB images this time) that rely on evolutionary computing 🧬!
At the end, it is clear that once again, the problem is far from being easy! Due to the current attention raised by deep learning 🧠, and due to its success on image processing 🖼️ with convolutional architectures, I believe that modern solutions would prioritize this type of approach. This seems to be the case for instance in a presentation by RealSense of their own algorithms for depth cameras. If we think in terms of open and accessible approaches, the question remains about a frugal and open source solution to keep the Kinect devices alive 🛟. For now, the OpenNI/NITE couple, although not fully open, seems a reliable one and I decided to go with it.
Hands on! Setting up a Linux Kinect development environment
After covering multiple aspects of the skeleton tracking problem, we will now see how to actually set up the hardware and run a first tracking program. We will work on the first Kinect in its XBox 360 model (excluding the Kinect for Windows one) and the OpenNI library.
Setting up the hardware
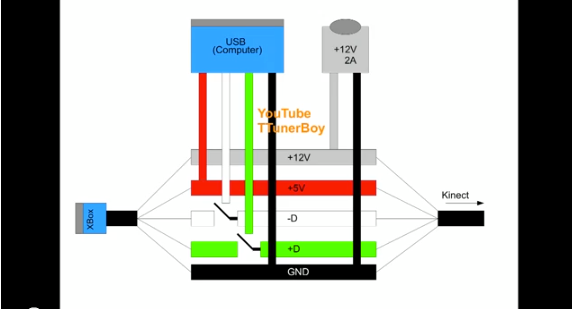
The first step to work with the Kinect is to connect it to a computer 🔌! As straightforward as it seems, this is already the first difficulty since the Xbox 360 Kinect had its own custom plug 😧. Fortunately, the communication between the Kinect and the console is performed over USB but the Kinect also requires its own 12V power supply ⚡ that cannot be taken from USB (The Xbox was able to provide 12V on its own through the custom cable). This nice tutorial by squiggy2 explains how to rewire Kinect’s original cable by separating the USB wires from the power ones.
⚠️ Warning, working with electricity always comes at a risk.
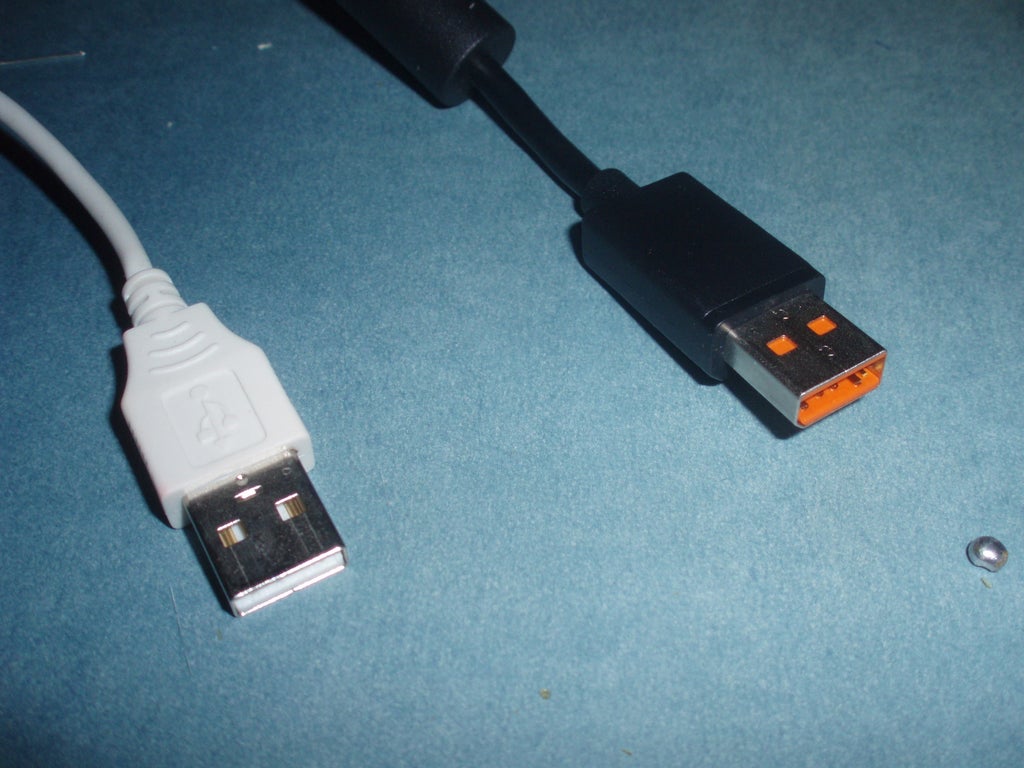
> One the left, a classical USB cable. On the right, the Kinect custom cable. Images by squiggy2.
To perform the wiring, you need a 12V power supply that would be plugged in addition to the USB cable. A 12V and 2A (24W) must work fine. Instead of buying a new one, this type of supply may usually be found from old devices such as laptop charging blocks 🔋. At the moment of writing these lines, I also realise that the Kinect could even be plugged to a desktop computer’s power supply 🖥️. I also wondered if modern USB-C charging blocks could be used as a power supply since they support multiple output tension but extra eltronics would be necessary and it seems that on 12V, the maximum power might not be enough for the Kinect ❌.
Setting up OpenNI and NITE library
We will see now how to install OpenNI on recent Ubuntu distributions 🐧, starting from an empty system. I tested the scripts inside a live Ubuntu USB image 🖫 to ensure that the procedure is reproducible. We will make sure that at the end of the installation, it is possible to compile and run few program samples to develop with skeleton data 🩻.
The three piece of softwares will be obtained from these three (non official) git repositories hosted on github:
- OpenNI:
https://github.com/smbct/OpenNI.git - SensorKinect:
https://github.com/smbct/SensorKinect.git - NITE:
https://github.com/arnaud-ramey/NITE-Bin-Dev-Linux-v1.5.2.23.git
These repositories have evolved from the original releases in order to maintain compatibility and fix multiple issues. One recent issue with OpenNI was a compilation error caused by a clash on C++ macro names between the source and recent versions of the GCC compiler. This error almost made me give up on the installation ❌ when I started the project! Fortunately, several people have been working on a fix 😇. One of the proposed solution is to downgrade GCC ⤵️ to an older version, as suggested here and here. I am however not a big fan of this as replacing the GCC version (even temporarily) is somehow intrusive 🥷 in the system. Another solution has been proposed by roncapat via a pull request on github: renaming the macro in question. I did not see this at the time I tried and I actually came up with the exact same modification in my fork 🤦 (Note to self: always check the pull requests, they are particularly informative.)
To simplify the installation process, I created a bash install script in a github repository. The installation can then be done by cloning the repository and executing the bash script with root privileges:
1
2
3
git clone https://github.com/smbct/KinectOpenNISetup.git
cd ./KinectOpenNISetup
sudo bash install_openni_kinect.sh
This should install the dependencies and then download, compile, and install the OpenNI library, the Kinect driver and the NITE binary library. Once the installation is complete, the Kinect can be connected to the computer 🖥️ and tested via the two C++ examples in the repository. These examples have been developed to help reproduce the development environment. Fom these, one may simply copy the source files and the Makefile to setup its own script. The code source has been made simple to build upon it.
The first example, SimpleSkeletonRevisited, is a console-only program that prints skeleton information in the terminal. A calibration phase is necessary for OpenNI to compute the skeleton joints: this can be performed simply as standing in front of the Kinect at a reasonable distance. After that, the program should print the 3D position of one skeleton joint:
1
2
3
4
# from KinectOpenNISetup directory
cd SimpleSkeletonRevisited
make SimpleSkeletonRevisited
./SimpleSkeletonRevisited
The second example, SkeletonViewer is a graphical program that displays a 3D scene with openGL and the freeglut library.
1
2
3
4
# from KinectOpenNISetup directory
cd SimpleSkeletonRevisited
make SimpleSkeletonRevisited
./SimpleSkeletonRevisited

> The small program SkeletonViewer that I wrote for visualizing the skeleton in 3D.
More examples are available in the OpenNI directory.
They are being compiled with the library when running the install script.
They can be found in the directory OpenNI/Platform/Linux/Redist/OpenNI*/Samples/Bin/x*-Release and may serve as tutorials for more advanced features.
⚠️ Note: when I first tried the installation process a few time ago I came across a running issue with the Kinect.
I had to follow the procedure described here: sudo -s &&
echo -1 > /sys/module/usbcore/parameters/autosuspend.
For some reason, I did not have the issue anymore when writing this post 🤷.
Runnning the Kinect inside a container
As I was looking for a simpler way of setting up the Kinect/OpenNI/NITE development environment, my idea was to build a container with all the tools installed in it. More precisely, containerization is a software technology that allows to create an isolated environment in the Operating System to execute a program in a controlled way (in terms of software dependencies and not necessarily in terms of security! ⚠️).
I created a small Apptainer image definition file to create an image with a working development environment. Unfortunately at first, the Kinect wouldn’t be recognised by any test program… I identified a small missing piece of code in the driver and created a commit to fix the issue. I may write a future blog post to add more details of the debugging process which I find interesting (I have almost no knowledge in driver development!).
With Apptainer installed in the system, the following commands allow to create the apptainer image:
1
2
3
git clone https://github.com/smbct/KinectOpenNISetup.git
cd ./KinectOpenNISetup
apptainer build openni_kinect.sif openni_kinect.def
Once the image is created, it is possible to open a shell inside the container with the command:
apptainer shell openni_kinect.sif
Once inside the container, the examples can be compiled and run:
1
2
3
4
# from within openni_kinect.sif shell
cd SimpleSkeletonRevisited
make SimpleSkeletonRevisited
./SimpleSkeletonRevisited
⚠️ Note: graphical programs cannot be run by default on some systems, which prevents from running the SkeletonViewer example.
I encountered this issue when working on a gnome+wayland desktop (Debian default).
It is possible to solve the issue with the following command (on the host, outside of the container): xhost +SI:localuser:$(id -un).
See more details on the issue here.
What about Windows and MacOS ?
I have only covered Linux systems here for two main reasons 🤔: I am more familiar with them and they are more accessible for experienced users/developers. However the OpenNI release also contains a Windows and a MacOS version 👍. I have no idea of what still works and what does not in recent versions of these operating systems though… Some documentation on the installation for Windows can still be found here and here.
Concluding thoughts
I hope that this post gives an interesting overview of what the Kinect is capable of and how to use it in some projects. A lot of elements were not covered here such as hardware modes for the Kinect, variations of the open source drivers for different platforms (for instance I found a version of the avin2 driver specialized for Debian), about the Kinect audio system 🎤 that was apparently also reverse engineered, the Kinect 2 drivers, etc… There is definitely more to be explored.
I do have several ideas yet for further improving the usability, performance and openness of the Kinect software ecosystem. It is already possible to build 👷 upon existing open source code to improve its maintainability (I am indeed talking about OpenNI…). The skeleton tracking part is also critical ⚠️ as the NITE library is not open source. This prevents for instance a port to arm devices such as the raspberry pi. There are only few solutions here but I do believe that there is always a way.
Anyway, for now what started as a hobby to me has also become a source of reflection about aging hardware, obsolescence and open source development 😀. Helping to keep an old gaming device alive might not be the most useful software contribution 💽 but it is a good opportunity to enjoy “old” technology 🧓 and to learn more about how things work 🤓!
I still believe that keeping things alive has its point though. This may be a way of opening technology to everyone, which is reflected with the Kinect by numerous hacking/modding projects and more recently around VR. We are definitely far from high end devices such as the Apple Vision Pro here 👓, even the name sounds rather restrictive… The Kinect once again did not stop at gaming: I found two more examples in surgery 🧑⚕️ and therapy 🪖. The device is also an interesting tool for artists, to help questioning our relationship to computers through the lens of User Interfaces for example. To me, all these applications make it worth the time investment ⌚. And beyond this particular device, I am convinced that we have everything to gain from maintaining old yet operational systems.