In the previous chapter, we saw the use of vector registers in assembly to perform floating point operations on decimal numbers. Although the result was already interesting, still it is a shame that a wonderfull object such as the Mandelbrot set cannot be visualized under its best angle.
In this chapter, we will build from this previous code and bring it to a new dimension by using a graphical library 📊. This will allow us to see how such library 📚 can be linked 🔗 to our program and how to call its functions 📣 directly from our assembly program.
Setting up a graphical library from x86-64
Our first step is to pick an appropriate library for our project. This idea led me directly to the Simple and Fast Multimedia Library (SFML). This library offers numerous functionalities to build graphical applications with hardware acceleration, support for audio 🎧 and networking 🛜, etc.. while being extremely easy to use. The SFML library is coded in C++ but we will actually not rely on its native version in our program.
![]()
> The SFML logo.
What’s wrong with C++ ?
I will be honest, it took me some time to make this chapter work properly. The natural choice to interface SFML with our program was to use its C++ API. However, it turns out to be quite delicate 😵💫 for several reasons.
We already saw in the 5th chapter how to call a function from a C compiled ⚙️ program in our assembly code. To do so, our compiled code (object file) just needed to be linked 🔗 to the compiled C code, and we were able to call 📣 our the function without any additional definition. This changes a little bit in C++ as some code is generated from the header files (function definitions, templated functions, etc..). This code is however only generated to produce a final executable and I was not able ❌ to obtain a compiled version of all the interface functions of the library.
C is on the other hand a much simpler language where object files contain everything that is needed to call a library’s API. This is why a finally decided to rely on the C SFML binding for this chapter (note 📝 that it is possible to create C bindings from any C++ library). C seems stable enough so that the binding is actually chosen instead of the native C++ API as basis of othe bindings such as the .NET or the Rust ones. Quoting from the .NET bind page :
It is built on top of the C binding, CSFML, to ensure maximum compatibility across platforms.
Our first x86-SFML program
We will start by setting up our project to develop with the C-SFML library. The first step consists in downloading the C-SFML sources from the official page (there is no compiled release for Linux at the moment). There is no need to download 🛜 the original C++ SFML library as the CSFML binding already contains these sources. CMake will then allow to compile the sources and install the binaries on your system.
Project configuration
We will start with a simple main function in x86 assembly.
We rely on the libc main function in order to allow the use of the C standard library in our program with useful functions such as printf.
1
2
3
4
5
6
7
8
9
10
11
12
13
14
15
16
17
18
19
20
21
22
23
24
25
26
27
28
29
30
31
.global main
.intel_syntax noprefix

main:

    push rbp ; storing the rbp value before manipulation
    mov rbp, rsp ; storing the rsp register

    ; storing the preserved registers
    push rdi
    push rsi

    mov rax, 1
    mov rdi, 1
    lea rsi, [hello_world]
    mov rdx, 14
    syscall

    pop rsi
    pop rdi

    ; restoring the rsp and rbp registers
    mov rsp, rbp
    pop rbp

    ; return
    mov rax, 0
    ret

hello_world:
    .asciz "Hello, World!\n"
The compilation will be performed in two steps as we already did in previous chapters : first compiling (more accurately assembling) the x86 source files into object files, and second linking the object files together with the additional external libraries 📚.
We will create a Makefile to simplify the use of long compilation commands here. The makefile will contain only 2 lines :
1
2
3
4
5
hello_sfml: hello_sfml.o
	gcc hello_sfml.o -lcsfml-graphics -lcsfml-window -lcsfml-system -o hello_sfml

hello_sfml.o: hello_sfml.s
	as hello_sfml.s -c -o hello_sfml.o
The main new thing in our linking command is the C-SFML shared library files for the graphics, window and system modules respectively.
You could also notice that here we omitted the -static options we used in the previous chapters.
This is because now we are working with a shared library.
This means that the C-SFML object code will not be incorporated in the final executable of our program but will be loaded at runtime instead.
Let’s now try to compile our program thanks to our Makefile with the make command:
1
2
3
4
5
6
7
> make hello_sfml
as -g hello_sfml.s -c -o hello_sfml.o
gcc hello_sfml.o -lcsfml-graphics -lcsfml-window -lcsfml-system -o hello_sfml
/usr/bin/ld: hello_sfml.o: relocation R_X86_64_32S against `.text' can not be used when making a PIE object; recompile with -fPIE
/usr/bin/ld : impossible de fixer les tailles des sections dynamiques : bad value
collect2: error: ld returned 1 exit status
make: *** [Makefile:48 : hello_sfml] Erreur 1
We can see 🧐 that removing the -static option from our linking command ⛓️ actually introduced an error 🚫.
The linker (ld) complains because we are making a PIE file, namely a Position Independant Executable.
Indeed, adding a shared library to our program implies that it will references additional compiled code (from the library) during its execution.
For this reason, all the references (or line numbers) in our code must be relative to the current instruction (that is stored in the rip register).
A simple fix to make our program compile ✅ as a PIE executable consists in specifying the rip register werether a data label is referenced in the code.
Here, this only happens when referencing our “Hello, World!\n” string, at line 15.
Our code should then become :
1
lea rsi, [rip+hello_world]
This way, the asembler will know we that we are creating a Position Independent Executable, where references are relatives to the pointed instruction.
The code should now compile ⚙️ with the make command.
Opening a window in CSFML
We can now start calling SFML functions through its C API. Our first goal will be to create and open a new window 🪟.
Opening a window in C with CSFML
A simple way to start our implementation consists in first creating a C code that creates a window 🪟 in SFML and then using GCC to create assembly from this code and analyse how the functions are called. This is in fact similar to what we did in chapter 7 to see how floating point operations were performed. Our basis will be the follwing code :
1
2
3
4
5
6
7
8
9
10
11
12
13
14
15
16
17
18
19
20
21
#include <unistd.h>
#include <SFML/Graphics.h>

int main(int argc, char* argv[]) {

    const sfVideoMode mode = {800, 600, 32};

    // create the main window
    sfRenderWindow* window = sfRenderWindow_create(mode, "SFML window", sfResize | sfClose, NULL);

    // display the window
    sfRenderWindow_display(window);

    // pause
    sleep(5);

    // destroy the window
    sfRenderWindow_destroy(window);

    return 0;
}
You can see that this program simply creates a window “object” (data structure) by calling the sfRenderWindow_create function.
The window is then displayed followed by a pause to actually see the window.
After that, the window object is cleaned up using a destroy function.
The C API of the SFML library will always follow this scheme : the data of a C++ object is encapsulated in a struct, and dedicated functions allow the user to interact with it, including mermory allocating and de-allocating the object.
The following two lines in our Makefile will allow to test the code :
1
2
3
4
5
create_window_c.o: create_window_c.c
	gcc create_window_c.c -c -o create_window_c.o

create_window_c: create_window_c.o
	gcc create_window_c.o -lcsfml-graphics -lcsfml-window -lcsfml-system -o create_window_c
Now before compiling this code into assembly, we need to perform some refactoring in order to simplify the task of calling the library 📚 from assembly. Indeed, in the above C code, the problem is that values are directly given in the function call without defining a proper variable with the corresponding data type. This makes the code more difficult to read 👓 since we should be able to understand precisely how the data structures are defined and what memory to allocate.
Here is the actual definition of the sfRenderWindow_create function, directly taken from the header file :
1
CSFML_GRAPHICS_API sfRenderWindow* sfRenderWindow_create(sfVideoMode mode, const char* title, sfUint32 style, const sfContextSettings* settings);
Let’s now refactor our previous code by explicitely creating variables for all the arguments :
1
2
3
4
5
6
7
8
9
10
11
12
13
14
15
// [...]

// window pointer
sfRenderWindow* window;

// window arguments
const sfVideoMode mode = {800, 600, 32};
const char* title = "SFML window";
sfUint32 style = sfResize | sfClose;
const sfContextSettings* settings = NULL;

// create the main window
window = sfRenderWindow_create(mode, title, sfResize | sfClose, settings);

// [...]
The code should function exactly as previously, except that now we can explicitly see 👀 what data is allocated in order to pass the parameters.
Opening a window from assembly
Let’s add a new entry in our Makefile to transform our previous code into assembly :
1
2
create_window_c.s: create_window_c.c
	gcc -S create_window_c.c -masm=intel -fdiagnostics-color=always -fverbose-asm -o create_window_c.s
For now, let’s extract the portion responsible of allocating the window 🪟 structure :
1
2
3
4
5
6
7
8
9
10
11
12
13
14
15
16
17
18
; create_window_c.c:12:     const char* title = "SFML window";
	lea	rax, .LC0[rip]	; tmp84,
	mov	QWORD PTR -24[rbp], rax	; title, tmp84
; create_window_c.c:13:     sfUint32 style = sfResize | sfClose;
	mov	DWORD PTR -28[rbp], 6	; style,
; create_window_c.c:14:     const sfContextSettings* settings = NULL;
	mov	QWORD PTR -16[rbp], 0	; settings,
; create_window_c.c:17:     window = sfRenderWindow_create(mode, title, sfResize | sfClose, settings);
	mov	rcx, QWORD PTR -16[rbp]	; tmp85, settings
	mov	rdx, QWORD PTR -24[rbp]	; tmp86, title
	mov	rsi, QWORD PTR mode.0[rip]	; tmp87, mode
	mov	eax, DWORD PTR mode.0[rip+8]	; tmp88, mode
	mov	r8, rcx	;, tmp85
	mov	ecx, 5	;,
	mov	rdi, rsi	;, tmp87
	mov	esi, eax	;, tmp88
	call	sfRenderWindow_create@PLT	;
	mov	QWORD PTR -8[rbp], rax	; window, tmp89
The arguments of the sfRenderWindow_create function are of multiple types.
mode is a sfVideoMode structure (as we can see from the definition), title is a char array, style is a 32 bits integer and settings is a pointer.
-
The “settings” argument is the easyest to start with. Indeed, although this argument is a pointer ➡️, the default value
NULLis used in our code. Since pointers are just addresses, and since addresses are coded on 8 bytes, the value that will be given to the function will simply be a 0 coded on 8 bytes. This can be seen at lines 7 and 9 from the code above. -
The “title” argument is also an easy one to specify. Indeed, we already saw in the previous chapters how to manipulate arrays of characters in assembly. We can see at lines 2 and 3 that the string ⛓️ is defined at the
.LC0symbol in the code and its address is the stored in the stack 🥞. We can omit the stack part in our code as it is possible to directly reference the address of the symbol in the program’s memory. -
We saw that the “style” argument is a simple integer. Howether, its value is obtained through bitwise operators, which is a way to store several values into a unique variable. We can see at lines 4 and 5 that the resulting value of the combined flags
sfResize | sfCloseis actually 6. In our case, we can directly use this raw value in the code to simplify things. -
The last parameter, “mode”, has the type
sfVideoMode, which is a structure with 4 integers. We can see at lines 11 and 12 that its value is defined at symbolmode.0, that is :
1
2
3
4
5
6
7
mode.0:
; width:
	.long	800
; height:
	.long	600
; bitsPerPixel:
	.long	32
Since data values of a struct are contiguous in memory, this order will actually always be verified when defining a sfVideoMode.
We can see that the 3 values are coded on 4 bytes each (.long).
This implies that 12 bytes of memory are necessary to pass all the values.
This is the reason why this parameter is splitted across two registers, rdi that contains the width and height values contiguously (lines 11 and 15) and esi that contains the “bitsPerPixel” field on 4 bytes (lines 12 and 16).
We can now write our own assembly code to open the window, starting from the following basis :
1
2
3
4
5
6
7
8
9
10
11
12
13
14
15
16
17
18
19
20
21
22
23
24
25
26
27
28
29
30
31
32
33
34
35
36
37
38
39
40
41
.global main
.intel_syntax noprefix

main:

    push rbp ; storing the rbp value before manipulation
    mov rbp, rsp ; storing the rsp register

    ; memory allocation (window pointer)
    sub rsp, 8

    ; storing the preserved registers
    push rdi
    push rsi
    push rbx

    ; window creation
    ; [...]

    ; calling "display"
    ; [...]

    ; calling "sleep"
    ; [...]

    ; window destruction
    ; [...]

    pop rbx
    pop rsi
    pop rdi

    ; restoring the rsp and rbp registers
    mov rsp, rbp
    pop rbp

    ; return
    mov rax, 0
    ret

; constants definitions
Note 📝 that 8 bytes are allocated in the stack 🥞 as we need to store 🗄️ the window pointer (returned by the “create” function). We then start completing by defining the constants : the video mode, the window title and the style :
1
2
3
4
5
6
7
8
9
10
11
12
13
14
15
; constants definitions
window_title:
   .string	"SFML x86 window"

; window video mode
window_width:
    .long 800
window_height:
    .long 600
window_depth:
    .long 32

; window style (sfResize | sfClose)
window_style:
    .long 6
Now we can complete the code by calling the “create” function. Recall that the order of the registers for the parameters are given in this table (see chapter 5).
1
2
3
4
5
6
7
8
9
10
11
12
; window creation
; video mode
mov rdi, [rip+window_width]
mov esi, [rip+window_depth]
; title
lea rdx, [rip+window_title]
; style
mov ecx, [rip+window_style]
; settings
mov r8, qword ptr 0
call sfRenderWindow_create
mov [rbp-8], rax ; store the window ptr
Moreover, it is now also necessary to specify the rip register as we are creating a PIE and it is not necessary to provide any definition of the library functions to our code, contrary to other languages such as C or C++ as we saw in chapter 5.
We can now add the other function calls, that are much simpler in terms of arguments :
1
2
3
4
5
6
7
8
9
10
11
; calling "display"
mov rdi, [rbp-8]
call sfRenderWindow_display

; calling "sleep"
mov edi, 5
call sleep

; window destruction
mov rdi, [rbp-8]
call sfRenderWindow_destroy
We can see that the two other CSFML functions have only one argument which is the address of the window object 🪟 (pointer), and do not return anything. The complete code can be compiled with a Makefile entry similar to the one from our previous CSFML “hello world”. It should now function exactly as the analog C program.
Graphical Mandelbrot
As we can now display an SFML window 🪟 from assembly, it is time to actually draw the Mandelbrot set 🖍️! We will first see how to draw pixel per pixel in an image and display the result on the window.
Drawing in SFML
Although providing a complete tutorial on SFML is not the goal of this chapter, it is still important to see how drawing 👾 works in this library 📝. We actually need to manipulate 3 different type of objects in our code in order to achieve the drawing.
-
The first object type is
sfImage. It allows to store and manipulate an array of pixel. -
The second one is
sfTexture. It is also used to store pixels but this object is actually stored on the graphics card side, in order to speed up the display 🖥️. -
The third oblect to manipulate is
sfSprite. Although thesfTextureobject already prepare an image to be displayed on the screen by the hardware, it is still necessary to provide additional options such as its coordinates and its rotation. This type is used to store these information so that several graphical object with the same texture can be manipulated sepatately.
![]()
> A screenshot from super mario word, where several objects such as the enemies and the clouds are drawn several times with the same texture.
Similarly to the previous part, we can write a C code that performs a drawing through these three different objects. Starting from our previous C code, we can add the following lines :
1
2
3
4
5
6
7
8
9
10
11
12
13
14
15
16
17
18
19
20
21
22
23
24
25
26
27
28
29
30
31
32
// window creation
// [...]

// creating and displaying a drawing
const int width = 800, height = 600;
sfImage* image = sfImage_create(width, height); // image object

// coloring a pixel in red at coordinates (42,42)
sfColor color_red = sfColor_fromRGB(255, 0, 0);
sfImage_setPixel(image, 42, 42, color_red);

sfTexture* texture = sfTexture_createFromImage(image, NULL); // texture object

sfSprite* sprite = sfSprite_create(); // sprite object
sfSprite_setTexture(sprite, texture, sfTrue);

sfRenderWindow_drawSprite(window, sprite, NULL);

// display the window
// [...]

// dealocate the drawing objects
// destroy the sprite
sfSprite_destroy(sprite);

// destroy the texture
sfTexture_destroy(texture);

// destroy the image
sfImage_destroy(image);

// [...]
This code can be tested and should add a red pixel 🟥 in our window, at coordinate (42,42) (the origin being the upper left corner). We can observe a cascading dependance between each object : the sprite depends on the texture that depends on the image. At some point, a pointer ➡️ is passed from one object to the next object.
Let’s generate the result in assembly :
1
2
3
4
5
6
7
8
9
10
11
12
13
14
15
16
17
18
19
20
21
22
23
24
25
26
27
28
29
30
31
32
33
34
35
36
37
38
39
40
41
42
43
44
45
46
47
48
49
50
51
; create_window_c.c:22:     sfImage* image = sfImage_create(width, height); // image object
	mov	edx, DWORD PTR -56[rbp]	; height.0_1, height
	mov	eax, DWORD PTR -60[rbp]	; width.1_2, width
	mov	esi, edx	;, height.0_1
	mov	edi, eax	;, width.1_2
	call	sfImage_create@PLT	;
	mov	QWORD PTR -24[rbp], rax	; image, tmp92


; create_window_c.c:24:     sfColor color_red = sfColor_fromRGB(255, 0, 0);
	mov	edx, 0	;,
	mov	esi, 0	;,
	mov	edi, 255	;,
	call	sfColor_fromRGB@PLT	;
	mov	DWORD PTR -52[rbp], eax	; color_red, tmp94

; create_window_c.c:25:     sfImage_setPixel(image, 42, 42, color_red);
	mov	edx, DWORD PTR -52[rbp]	; tmp95, color_red
	mov	rax, QWORD PTR -24[rbp]	; tmp96, image
	mov	ecx, edx	;, tmp95
	mov	edx, 42	;,
	mov	esi, 42	;,
	mov	rdi, rax	;, tmp96
	call	sfImage_setPixel@PLT	;

; create_window_c.c:33:     sfTexture* texture = sfTexture_createFromImage(image, NULL); // texture object
	mov	rax, QWORD PTR -24[rbp]	; tmp97, image
	mov	esi, 0	;,
	mov	rdi, rax	;, tmp97
	call	sfTexture_createFromImage@PLT	;
	mov	QWORD PTR -16[rbp], rax	; texture, tmp98

; create_window_c.c:35:     sfSprite* sprite = sfSprite_create(); // sprite object
	call	sfSprite_create@PLT	;
	mov	QWORD PTR -8[rbp], rax	; sprite, tmp99

; create_window_c.c:36:     sfSprite_setTexture(sprite, texture, sfTrue);
	mov	rcx, QWORD PTR -16[rbp]	; tmp100, texture
	mov	rax, QWORD PTR -8[rbp]	; tmp101, sprite
	mov	edx, 1	;,
	mov	rsi, rcx	;, tmp100
	mov	rdi, rax	;, tmp101
	call	sfSprite_setTexture@PLT	;

; create_window_c.c:40:     sfRenderWindow_drawSprite(window, sprite, NULL);
	mov	rcx, QWORD PTR -8[rbp]	; tmp102, sprite
	mov	rax, QWORD PTR -32[rbp]	; tmp103, window
	mov	edx, 0	;,
	mov	rsi, rcx	;, tmp102
	mov	rdi, rax	;, tmp103
	call	sfRenderWindow_drawSprite@PLT	;
We can see that this code is very similar to the previous one : the different objects (image, texture and sprite) are maniuplated through their pointers.
The new type here is sfColor that stores a color coded on three components : red 🟥, green 🟩 and blue 🟦 values between 0 and 255.
If we look at the sfColor definition in the CSFML header, we can see that it is actually composed of 4 8-bits values, one for each color and one for opacity :
1
2
3
4
5
6
7
typedef struct
{
    sfUint8 r;
    sfUint8 g;
    sfUint8 b;
    sfUint8 a;
} sfColor;
This implies that we can actually define the color directly with a symbol in our code instead of needing to call the sfColor_fromRGB function.
Let’s now add the assembly calls into our program. We first allocate more memory into the stack 🥞 in order to store the image, texture and sprite pointers ➡️ :
1
2
3
4
5
6
; memory allocation
sub rsp, 40
; rbp-8 : window pointer, 8 bytes
; rbp-16 : image pointer, 8 bytes
; rbp-24 : texture pointer, 8 bytes
; rbp-32 : sprite pointer, 8 bytes
We also add the symbol corresponding the red color (red and opacity compenent at 100% 💯), which is coded on 4 8-bits (1 byte) values :
1
2
color_red:
	.byte 255, 0, 0, 255
And we can now add the function calls 📣 to create and destroy the objects and to actually draw on the screen :
1
2
3
4
5
6
7
8
9
10
11
12
13
14
15
16
17
18
19
20
21
22
23
24
25
26
27
28
29
30
31
32
33
34
35
36
37
38
39
40
41
42
43
44
45
46
47
48
49
50
51
52
53
54
55
; window creation
; [...]

; image creation
mov edi, [rip+window_width] ; image width
mov esi, [rip+window_height] ; image height
call sfImage_create
mov [rbp-16], rax ; image ptr

; draw on the image
mov rdi, [rbp-16] ; image ptr
mov esi, 42 ; x coordinates
mov edx, 42 ; y coordinates
mov ecx, [rip+color_red] ; color
call sfImage_setPixel

; texture creation
mov rdi, [rbp-16] ; image ptr
mov esi, 0
call sfTexture_createFromImage
mov [rbp-24], rax ; texture ptr

; sprite creation
call sfSprite_create
mov [rbp-32], rax ; sprite ptr

; sprite set texture
mov rdi, [rbp-32] ; sprite ptr
mov rsi, [rbp-24] ; texture ptr
mov edx, 1
call sfSprite_setTexture

; drawing the sprite
mov rdi, [rbp-8] ; window ptr
mov rsi, [rbp-32]
mov edx, 0
call sfRenderWindow_drawSprite

; window display and sleep
; [...]

; sprite destruction
mov rdi, [rbp-32]
call sfSprite_destroy

; texure destruction
mov rdi, [rbp-24]
call sfTexture_destroy

; image de destruction
mov rdi, [rbp-16]
call sfImage_destroy

; window destruction
; [...]
We can see a very typical scheme in the API. The pointer (memory address) of the object to manipulate is systematically passed to the function. Additional parameters may also be provided such as a pointer to another object. In order to choose the right register size for these parameters, it is handy to compile C code into assembly but it is also possible to directly look at the function and type definitions.
Drawing a rectangle
Now that we are able to draw on the screen, we can implement a simple square drawing algorithm. This is done through two nested “for” loops. We first add two local variables in our main function to iterate over the x and y coordinates :
1
2
3
4
5
6
7
8
; memory allocation
sub rsp, 40
; rbp-8 : window pointer, 8 bytes
; rbp-16 : image pointer, 8 bytes
; rbp-24 : texture pointer, 8 bytes
; rbp-32 : sprite pointer, 8 bytes
; rbp-36 : temp x coordinate, 4 bytes
; rbp-40 : temp y coordinate, 4 bytes
By allocating 4 bytes per variable, there is no need to extend the stack 🥞 allocation because of the current 16-bytes alignement. Then, we write our double nested “for” loop that iterates of the coordinates :
1
2
3
4
5
6
7
8
9
10
11
12
13
14
15
16
17
18
19
20
mov [rbp-36], dword ptr 20
.L_for_temp_x: ; for loop x coordinates

    mov [rbp-40], dword ptr 20
    .L_for_temp_y: ; for loop y coordinates

        ; draw on the image
        mov rdi, [rbp-16] ; image ptr
        mov esi, [rbp-36] ; x coordinates
        mov edx, [rbp-40] ; y coordinates
        mov ecx, [rip+color_red] ; color
        call sfImage_setPixel

        inc dword ptr [rbp-40]
        cmp [rbp-40], dword ptr 50
        jne .L_for_temp_y

    inc dword ptr [rbp-36]
    cmp [rbp-36], dword ptr 60
    jne .L_for_temp_x
The result should be similar to the following screen capture (upper left part of the screen).

> The resulting rectangle (cropped).
Drawing the Mandelbrot set
Our last step is now to include our code from the previous chapter in order to draw the Mandelbrot set in the window. This is actually the easy part since all the hard work was done in the last chapter. We will build from the two functions : test_convergence and draw_mandelbrot.
These two functions can be added in a separate file “mandelbrot.s” in order to structure our project as we already did in the previous chapter. This will require us to add few lines in the Makefile in order to compile ⚙️ this new file into an object file and to link 🔗 it when making the final executable.
The test_convergence function does not need any modification, it still receives the normalized coordinates as input and decide if the corresponding pixel must be drawn or not.
The draw_mandelbrot function however needs some adjustments.
First, in order to draw the pixels, it is necessary to pass the image pointer to the function and store it in the stack 🥞 :
1
2
3
4
5
6
7
8
9
10
11
12
13
14
15
16
17
18
19
; ----------------------------------------------------------
; draw the ascii mandelbrot set
; edi: width
; esi: height
; rdx: sfImage pointer
draw_mandelbrot:

    ; stack allocation
    sub rsp, 40
    ; width: rbp-4, 4 bytes
    ; height: rbp-8, 4 bytes
    ; [...]
    ; image pointer: rbp-40, 8 bytes

    ; store the parameters
    ; [...]
    mov [rbp-40], rdx

    ; [...]
Then the printing instructions must be replaced by a call to sfImage_setPixel function :
1
2
3
4
5
6
7
8
9
10
11
12
13
14
15
16
; .L_if_converge:

    ; draw a pixel
    mov rdi, [rbp-40] ; image ptr
    mov esi, [rbp-16] ; x coordinates
    mov edx, [rbp-12] ; y coordinates
    mov ecx, [rip+color_red] ; color
    call sfImage_setPixel

    jmp .L_end_if_converge

.L_if_not_converge:

    ; do nothing

.L_end_if_converge:
Additionaly, it is necessary to add the rip register when referencing data at some labels as we saw previously and to remove all the extra printing 🖨️ instructions.
The last missing piece to our code is the call to draw_mandelbrot in the main function that replaces the previous sfImage_setPixel calls :
1
2
3
4
5
6
7
8
9
10
11
; image creation
; [...]

; call the draw_mandelbrot function
mov edi, [rip+window_width]
mov esi, [rip+window_height]
mov rdx, [rbp-16] ; image pointer
call draw_mandelbrot

; texture creation
; [...]
Everything should now be in place to compile and test our program :
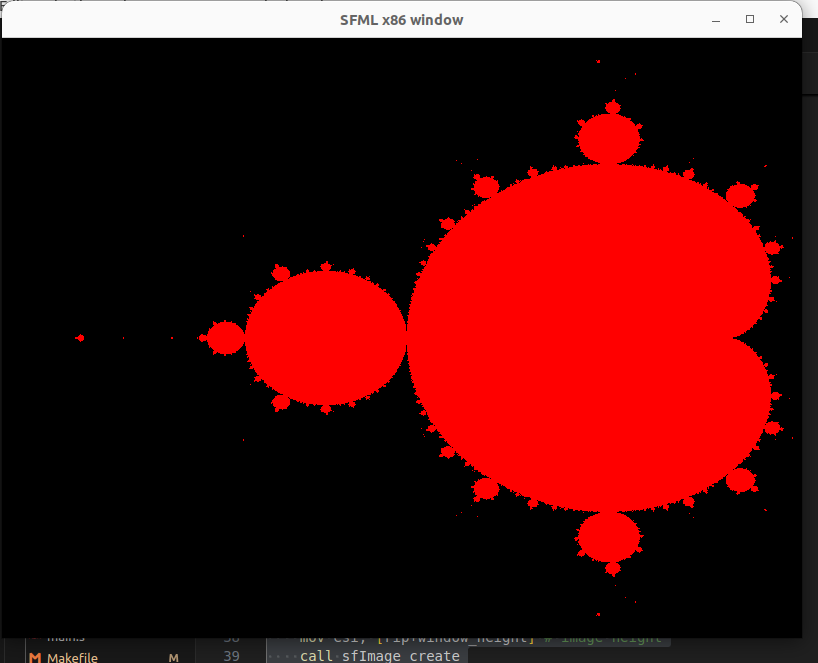
> Our Mandelbrot set in an SFML window!
Perfect! 🥳 Feel free to improve the figure by adding colors depending on the number of iterations when testing the convergence for instance 😃.
Bonus : coding the window loop
Our goal is already achieved in this chapter but we did not exploit the full potential of window 🪟 application as the user cannot interact with the window yet. For instance, it would be great if we could close the application through the dedicated window button ❌.
Instead of digging in the documentation we can already observe how the main window loop is coded in C and use automatic assembly code generation to take some inspiration 😤. Here is the basic code scheme :
1
2
3
4
5
6
7
8
9
10
11
12
13
14
15
16
17
18
19
20
21
22
23
24
25
// create the main window
// [...]

//-------------------------------------------------
// Start the application loop
sfEvent event;
while (sfRenderWindow_isOpen(window)) {

    // Process events
    while (sfRenderWindow_pollEvent(window, &event)) {
        // Close window : exit
        if (event.type == sfEvtClosed) {
            sfRenderWindow_close(window);
        }
    }

    // draw in the window
    // [...]

    // Update the window
    sfRenderWindow_display(window);
}

// destroy the window
// [...]
This loop, when inserted in between the window object allocation and its deallocation, should allow the user to contemplate the window 🪟 until they closes it with the cross. All the drawing code must go just before the display function call.
In order to allow the user to interact with the window, the program must check the “events”. Events are of different type : mouse button pressed 🖱️, key pressed ⌨️, window button triggered ❌, etc.. Since multiple events may be present at each iteration, a while loop 🔁 helps processing them all at once.
In our assembly code, this means that we need to call 3 new functions : sfRenderWindow_isOpen, sfRenderWindow_pollEvent and sfRenderWindow_close.
The most difficult part will be to understand how the event type is coded.
To do so, we can write a small C program that creates and processes an event :
1
2
3
4
5
6
7
8
9
10
11
12
13
14
15
16
// window creation
// [...]

// test with the event type
sfEvent event;

// output the size of sfEvent struct, in bytes
printf("event size: %ld\n", sizeof(sfEvent));

// function call needing an sfEvent pointer
sfRenderWindow_pollEvent(window, &event);

event.type = sfEvtClosed;

// window destruction
// [...]
When compiled into an executable, this program indicates that the size (in bytes) of the sfEvent type is 28 thanks to the sizeof operator.
This information will be useful when allocating space in the stack 🥞 to store the event variable.
We can now automatically generate the corresponding assembly code for the lines of interest :
1
2
3
4
5
6
7
8
9
10
11
12
13
14
15
16
; test_event.c:21:     printf("event size: %ld\n", sizeof(sfEvent));
	mov	esi, 28	;,
	lea	rax, .LC1[rip]	; tmp90,
	mov	rdi, rax	;, tmp90
	mov	eax, 0	;,
	call	printf@PLT	;

; test_event.c:23:     sfRenderWindow_pollEvent(window, &event);
	lea	rdx, -48[rbp]	; tmp91,
	mov	rax, QWORD PTR -56[rbp]	; tmp92, window
	mov	rsi, rdx	;, tmp91
	mov	rdi, rax	;, tmp92
	call	sfRenderWindow_pollEvent@PLT	;

; test_event.c:25:     event.type = sfEvtClosed;
	mov	DWORD PTR -48[rbp], 0	; event.type,
We can see at line 2 that the size of sfEvent, 28, is directly hard-coded into the assembly code.
That is beacause the sizeof operator in C is processed at compile time.
Line 9 indicates that the event is located at address rbp-48 in the stack 🥞.
Since its size is 28, this means that the event is contained in the stack from address rbp-48 to address rpb-20.
Then, we can see at line 16 that the field type in the event is actually the first field of the structure, since its address is also the base address of the event (rbp-48) in the stack.
We also learn that the 4 bytes value 0 code for the event value sfEvtClosed.
We can use these information to create a new program in assembly that performs the classical main loop :
1
2
3
4
5
6
7
8
9
10
11
12
13
14
15
16
17
18
19
20
21
22
23
24
25
26
27
28
29
30
31
32
33
34
35
36
37
38
39
40
41
42
43
44
45
46
47
48
49
50
51
52
53
54
55
56
57
58
59
60
61
62
63
64
65
66
67
68
69
70
main:

    ; [...]

    ; stack allocation
    sub rsp, 72
    ; rbp-8 : window pointer, 8 bytes
    ; rbp-16 : image pointer, 8 bytes
    ; rbp-24 : texture pointer, 8 bytes
    ; rbp-32 : sprite pointer, 8 bytes
    ; rbp-36 ; temp x coordinate, 4 bytes
    ; rbp-40 ; temp y coordinate, 4 bytes
    ; rbp-68 ; event, 28 bytes

    ; storing the preserved registers
    ; [...]

    ; window creation
    ; [...]

    ; main window loop
    .L_while_window_open:

        ; test if window is open
        mov rdi, [rbp-8] ; window pointer
        call sfRenderWindow_isOpen
        test eax, eax
        jz .L_end_while_window_open

        ; poll event loop
        .L_while_poll_event:

            mov rdi, [rbp-8] ; window ptr
            lea rsi, [rbp-68] ; event ptr
            call sfRenderWindow_pollEvent

            ; leave poll event loop if no eventw
            test eax, eax
            jz .L_end_while_pool_event

            ; test event type and close the window if required
            mov eax, dword ptr [rbp-68]
            test eax, eax
            jnz .L_end_if_event_equal_close

            .L_if_event_equal_close:
                mov rdi, [rbp-8] ; window ptr
                call sfRenderWindow_close
            .L_end_if_event_equal_close:

            jmp .L_while_poll_event
        .L_end_while_pool_event:

        ; window draw instruction

        ; calling "display"
        mov	rdi, [rbp-8]
        call sfRenderWindow_display

        jmp .L_while_window_open
    .L_end_while_window_open:

    ; window destruction
    ; [...]

    ; restoring registers
    ; [...]

    ; return
    ; [...]
Once again, I ommitted in this code instructions that are not related to the main loop itself.
We can see the two nested while loops 🔁, one for keeping the window 🪟 open and another one for polling the events.
These loops are implemented slightly differently to what we saw previously : a systematic jump 🦘 is present at the end of each loop iteration.
The termination test is the performed at the beginning of the loop, before executing its instructions.
This is actually necessary in order to perform a proper while loop, where the termination test is done at the beginning.
Other than that, the different function calls 📣 are performed in order to gather the events, test if the window is open and close it when necessary.
We can see that the lea instruction is necessary to pass the event to the function as it is given as a pointer ➡️ (hence its memory address in the stack 🥞).
Moreover, the return value is coded on 4 bytes, as we could guess on the assembly code, and the test instruction is used to perform the tests.
What remains is adding our Mandelbrot code to draw the Mandelbrot set inside the main loop. The sprite should be displayed just before calling the window display function. However, the function that draws on the image can be called only once at the beginning of the program (outside the main loop).
What’s next ?
This chapter should already give a taste of what’s possible when developing in assembly. This is going to be the last chapter in this series as my primary goal was simply to show that assembly is just a language like another. I really hope the this series helps to narrow the gap between highy level programming and low level program execution.
The codes from this chapter are available at this link. Feel free to improve this code by, for instance, adding colors, zoom, mouse input, etc… At some point, developing in assembly should feel just a little less comfortable that using higher level languages 😇.
I will probably not be done with assembly yet as I still have some project ideas at the lower level of coding! Stay tuned! 🥳